Ever wonder how to analyze the flow of an application on a NSX-T logical segment? There are a few ways to do so, but in this blog post we will use NSX Intelligence. We can eventually use the recommendations to create firewall rules in NSX-T to secure the application.
Requirements
- NSX-T environment configured with Edges for North/South traffic
- Tanzu workload cluster (requirement for NSX Application Platform that is available in NSX-T 3.2)
- NSX Intelligence (is a feature that is available in NSX Application Platform)
Note: These steps are applicable for a environment that already have a deployed/configured NSX-T.
NSX application platform (NAPP)
NSX Application Platform (NAPP) is a modern microservices platform hosted on a Tanzu Kubernets cluster that includes the following NSX features:
- NSX intelligence
- NSX Network Detection and Response
- NSX Malware Prevention
- NSX Metrics
NAPP has the following core services that are being used by the features:
- Messaging
- Analytics
- Data Storage
- Metrics
More information about NSX Application Platform can be found at VMware Docs page about NAPP.
NSX Intelligence
NSX Intelligence provides a graphical user interface to visualize the security posture and network traffic flows that have occurred in your on-premises NSX-T Data Center environment. Starting from version 3.2, NSX Intelligence need to be deployed as a modern application in a vSphere with Tanzu environment. For this, we will need to configure a vSphere cluster as a Tanzu Supervisor Cluster.
Deploying a Tanzu Supervisor cluster.
Let's start with enabling the Tanzu Supervisor Cluster in the workload vCenter server. To do so, we need to login to vCenter and access the Workload Management option in the vCenter menu.
Click on Get Started to begin the configuration of the Workload Management Cluster

In our case, we will select NSX as the networking stack.

Assign storage policies to the different types of disks for the Kubernetes control plane VMs.

Assign storage policies to the different types of disks for the Kubernetes control plane VMs.

Configure the management network for the Kubernetes control plane VMs.

| Option | Description |
|---|---|
| vSphere Distributed Switch | Select the vSphere Distributed Switch that handles overlay networking for the Supervisor Cluster.For example, select DSwitch. |
| DNS Server | Enter the IP addresses of the DNS servers that you use with your environment, if any.For example, 10.142.7.1. |
| API Server Endpoint FQDN | Optionally, enter the FQDN of the API server endpoint. |
| Edge Cluster | Select the NSX Edge cluster that has the tier-0 gateway that you want to use for namespace networking.For example, select EDGE-CLUSTER. |
| Tier-0 Gateway | Select the tier-0 gateway to associate with the cluster tier-1 gateway. |
| NAT Mode | The NAT mode is selected by default.If you deselect the option, all the workloads such as the vSphere Pods, VMs, and Tanzu Kubernetes clusters Node IP addresses are directly accessible from outside the tier-0 gateway and you do not have to configure the egress CIDRs.**Note:**If you deselect NAT mode, File Volume storage is not supported. |
| Namespace Network | Enter one or more IP CIDRs to create subnets/segments and assign IP addresses to workloads. |
| Namespace Subnet Prefix | Enter the subnet prefix that specifies the size of the subnet reserved for namespaces segments. Default is 28. |
| Pod CIDRs | Enter a CIDR annotation to determine the IP range for vSphere Native Pods. You can use the default value. |
| Services CIDRs | Enter a CIDR annotation to determine the IP range for Kubernetes services. You can use the default value. |
| Ingress CIDRs | Enter a CIDR annotation that determines the ingress IP range for the Kubernetes services. This range is used for services of type load balancer and ingress. |
| Egress CIDRs | Enter a CIDR annotation that determines the egress IP for Kubernetes services. Only one egress IP address is assigned for each namespace in the Supervisor Cluster. The egress IP is the IP address that the vSphere Pods in the particular namespace use to communicate outside of NSX-T Data Center. |
Note: Management network should be able to communicate with the service CIDRs and the egress CIDR should be able to reach the DNS server.

Select the content library that contains the Tanzu Kubernetes OVA files.
Instructions on how to create a content library for Tanzu for vSphere can be found here.
Note: Make sure to configure the content library to download content Immediately. If not, you will see the following message when listing the Kubernetes releases with kubectl: No resources found

Select the Controle Plane Size and enter a FQDN for the API Server DNS Name and click on Finish to start the deployment.
This DNS record does not exist yet. You can create the DNS record after the deployment with the assigned Control Plane Node Address shown below:

We now have a Tanzu Supervisor cluster available.
The next steps will be creating a namespace for the creation of a Tanzu Kubernetes Cluster to run NAPP as modern application.
Create Namespace
A namespace is required to have for the deployment of NAPP. In a vSphere namespace you can define the amount of resources (memory and CPU) that could be used by the developers connecting to the namespace. It is also possible to assign storage policies, VM classes and Content libraries to vSphere namespace.
Let's start by creating a new vSphere namespace


Give the vSphere namespace a DNS compliant name

We need to configure the vSphere namespace with permissions, assigning a storage policy to the vSphere namespace for the placement of the control plane and worker nodes and we need to assign 2 VM classes: best-effort-small and best-effort-napp (custom VM Class).
In a VM class you define the amount of resources (Memory and CPU) that will be used for the deployment of the Control Plane and Worker Nodes.
See the following VMware link for the system requirements for NAPP.

Note: I'm not using any reservations for this test setup.
Create Tanzu Kubernetes Cluster
We are now ready to deploy our first Tanzu Kubernetes Cluster in the tkgs-ns-mgmt-01 namespace.
To do so, we need to have a windows or a linux machine that is able to reach the supervisor cluster API: api-tanzu.infra.local.
In my lab, i'm using a CentOS VM with the vSphere kubectl tools.
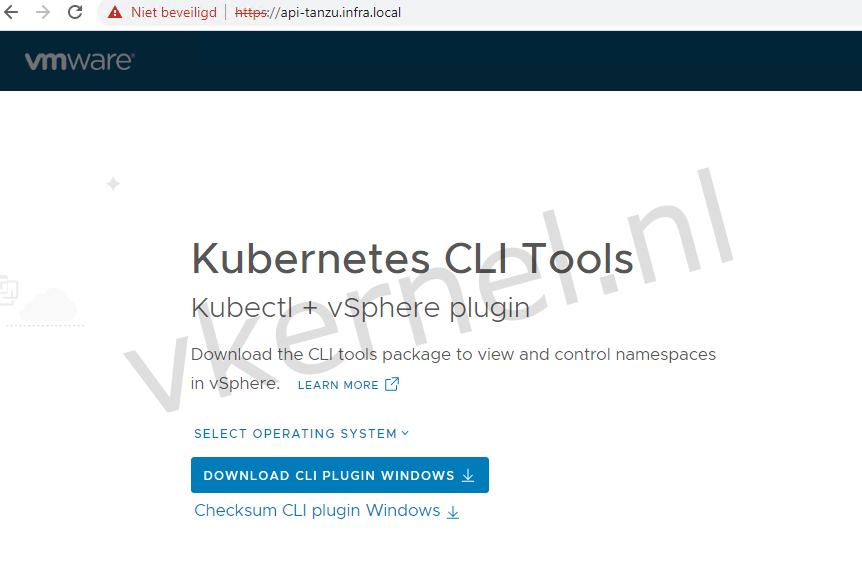
You can download the kubectl tools from the API web GUI: https://FQDN-API-SERVER
We need to create a YAML file where we define our Tanzu Kubernetes Cluster topology.
I have created tkgs-mgmt.yaml with the following content:
apiVersion: run.tanzu.vmware.com/v1alpha2
kind: TanzuKubernetesCluster
metadata:
  name: tkgs-cluster-01                                     #Name of the TanzuKubernetesCluster we want to deploy
  namespace: tkgs-ns-mgmt-01                                #Name of the vSphere namespace
spec:
  topology:
    controlPlane:
      replicas: 1                                           #The amount of Control Plane nodes
      vmClass: best-effort-small                            #VM class for the Control Plane nodes
      storageClass: vsan-default-storage-policy             #Define the Storage Class / Storage Policy
      tkr:
        reference:
          name: v1.21.6---vmware.1-tkg.1.b3d708a
    nodePools:
    - name: worker-nodepool-a1
      replicas: 1                                           #The amount of Worker nodes
      vmClass: best-effort-napp                             #VM class for the Worker nodes
      storageClass: vsan-default-storage-policy             #Define the Storage Class / Storage Policy
      volumes:                                              #Configuring the amount of storage
        - name: containerd
          mountPath: /var/lib/containerd
          capacity:
            storage: 1Ti
      tkr:
        reference:
          name: v1.21.6---vmware.1-tkg.1.b3d708a
Note: Use the following link to get the available kubectl commands to retrieve for example: Storageclasses and Tanzu Kubernetes Releases.
With the YAML file in place, we can now deploy our Tanzu Kubernetes Cluster in the tkgs-ns-mgmt-01 namespace.
[root@inf-cbcs-0-01 kubectl]# kubectl vsphere login --server api-tanzu.infra.local -u [email protected] --insecure-skip-tls-verify

KUBECTL_VSPHERE_PASSWORD environment variable is not set. Please enter the password below
Password:
Logged in successfully.

You have access to the following contexts:
   api-tanzu.infra.local
   tkgs-ns-mgmt-01

If the context you wish to use is not in this list, you may need to try
logging in again later, or contact your cluster administrator.

To change context, use `kubectl config use-context <workload name>`

[root@inf-cbcs-0-01 kubectl]# kubectl apply -f tkgs-mgmt.yaml
tanzukubernetescluster.run.tanzu.vmware.com/tkgs-cluster-01 created
Verify creation of cluster
[root@inf-cbcs-0-01 kubectl]# kubectl get tanzukubernetesclusters
NAME              CONTROL PLANE   WORKER   TKR NAME                           AGE     READY   TKR COMPATIBLE   UPDATES AVAILABLE
tkgs-cluster-01   1               1        v1.21.6---vmware.1-tkg.1.b3d708a   3m34s   False   True
You can see the phase of the Tanzu Kubernetes Cluster in the vSphere namespace view --> Compute --> Tanzu Kubernetes Clusters

Our new deployed Tanzu Kubernetes cluster has the phase Running
Generate a TKG configuration file with a Non-Expiring Token
The default kubeconfig file has a token that will expire after ten hours. This will result in a error message in the NSX Manager UI for the NSX Application Platform:
Unable to connect, system has encountered a connectivity issue due to the expiry of Kubernetes Configuration. Update the Kubernetes Configuration to resolve.
This will not impact the functionality of NAPP or any NSX security features in NAPP. The only downside of not having a Non-Expiring token is to recreate a new token everytime you want to:
- Deploy the NSX Application Platform
- Upgrade the NSX Application Platform
- Delete the NSX Application Platform
Execute the following steps to create a Non Expiring Token:
[root@inf-cbcs-0-01 kubectl]# kubectl vsphere login --server api-tanzu.infra.local -u [email protected] --tanzu-kubernetes-cluster-name tkgs-cluster-01 --tanzu-kubernetes-cluster-namespace tkgs-ns-mgmt-01 --insecure-skip-tls-verify

KUBECTL_VSPHERE_PASSWORD environment variable is not set. Please enter the password below
Password:
Logged in successfully.

You have access to the following contexts:
   api-tanzu.infra.local
   tkgs-cluster-01
   tkgs-ns-mgmt-01

If the context you wish to use is not in this list, you may need to try
logging in again later, or contact your cluster administrator.

To change context, use `kubectl config use-context <workload name>`
[root@inf-cbcs-0-01 kubectl]# kubectl create serviceaccount napp-admin -n kube-system
serviceaccount/napp-admin created

[root@inf-cbcs-0-01 kubectl]# kubectl create clusterrolebinding napp-admin --serviceaccount=kube-system:napp-admin --clusterrole=cluster-admin
clusterrolebinding.rbac.authorization.k8s.io/napp-admin created

[root@inf-cbcs-0-01 kubectl]# SECRET=$(kubectl get serviceaccount napp-admin -n kube-system -ojsonpath='{.secrets[].name}')

[root@inf-cbcs-0-01 kubectl]# TOKEN=$(kubectl get secret $SECRET -n kube-system -ojsonpath='{.data.token}' | base64 -d)

[root@inf-cbcs-0-01 kubectl]# kubectl get secrets $SECRET -n kube-system -o jsonpath='{.data.ca\.crt}' | base64 -d > ./ca.crt

[root@inf-cbcs-0-01 kubectl]# CONTEXT=$(kubectl config view -o jsonpath='{.current-context}')

[root@inf-cbcs-0-01 kubectl]# CLUSTER=$(kubectl config view -o jsonpath='{.contexts[?(@.name == "'"$CONTEXT"'")].context.cluster}')

[root@inf-cbcs-0-01 kubectl]# URL=$(kubectl config view -o jsonpath='{.clusters[?(@.name == "'"$CLUSTER"'")].cluster.server}')

[root@inf-cbcs-0-01 kubectl]# TO_BE_CREATED_KUBECONFIG_FILE="kubeconfig-mgmt.yaml"

[root@inf-cbcs-0-01 kubectl]# kubectl config --kubeconfig=$TO_BE_CREATED_KUBECONFIG_FILE set-cluster $CLUSTER --server=$URL --certificate-authority=./ca.crt --embed-certs=true
Cluster "10.27.50.4" set.

[root@inf-cbcs-0-01 kubectl]# kubectl config --kubeconfig=$TO_BE_CREATED_KUBECONFIG_FILE set-credentials napp-admin --token=$TOKEN
User "napp-admin" set.

[root@inf-cbcs-0-01 kubectl]# kubectl config --kubeconfig=$TO_BE_CREATED_KUBECONFIG_FILE set-context $CONTEXT --cluster=$CLUSTER --user=napp-admin
Context "tkgs-cluster-01" modified.

[root@inf-cbcs-0-01 kubectl]# kubectl config --kubeconfig=$TO_BE_CREATED_KUBECONFIG_FILE use-context $CONTEXT
Switched to context "tkgs-cluster-01".
This will result in a new file with kubeconfig file with a Non-Expiring Token named kubeconfig-mgmt.yaml.
We will use this file during the deployment of NAPP in the NSX-T Manager.
Deploy NSX Intelligence as modern application
Lets go into the NSX-T Manager and click on System --> NSX Application Platform and click on Deploy NSX Application Platform


I'm Leaving the Helm Repository and Docker Registry as default and select the Platform Target Version 3.2.1-1.0-2014067

Select the kubeconfig-mgmt.yaml file and click on upload. When you configure this for the first time, you will get the message to upload the kubernetes tools.
You can download these tools on the NSX-T download page at VMware. I'm using in my lab the latest file Kubernetes-tools 1.20
Kubernetes-tools 1.20 The Kubernetes command-line tool, kubectl, allows you to run commands against Kubernetes clusters. This toolset will work with Kubernetes v1.19, v1.20 & v.21
Configure the Storage Class with the storage policy of your choice.
Configure the Interface Service Name with a FQDN that will be used as the HTTPS endpoint to connect to the NSX Application Platform.
Configure the Messaging Service Name with a FQDN that will be used as the HTTPS endpoint to receive the streamlined data from the NSX data sources.
You can choose any available IP address from the ingress subnet to create the Interface and Messaging service name DNS records.
Check the ingres subnet IP Pool (Automatically created by Tanzu) in the IP Address Pools for the available IP addresses.

Perform the precheck and click on NEXT and click on DEPLOY at the Review & Deploy view.
The deployment will get started and at this point we can take a coffee break.
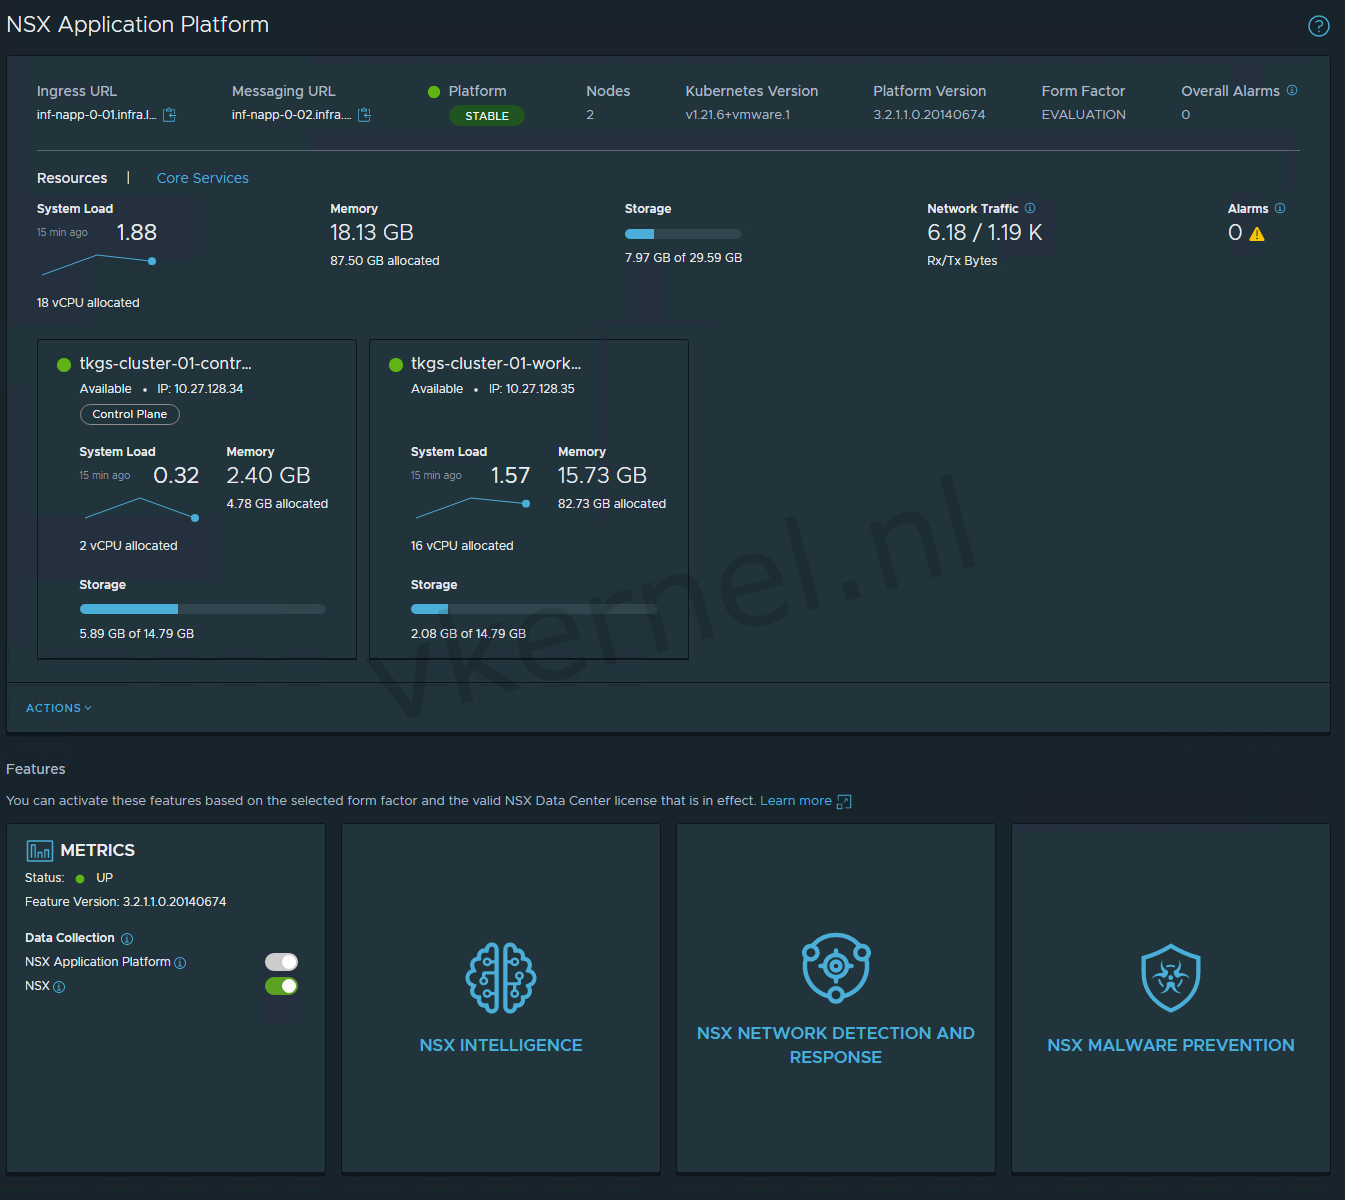
We now have now successfully deployed NAPP on our tkgs-cluster-01 Tanzu Kubernetes Cluster in the tkgs-ns-mgmt-01 namespace.
Activating NSX Intelligence
To enable the NSX Intelligence feature in NAPP by hovering your mouse on the NSX Intelligence tile and click on Activate.
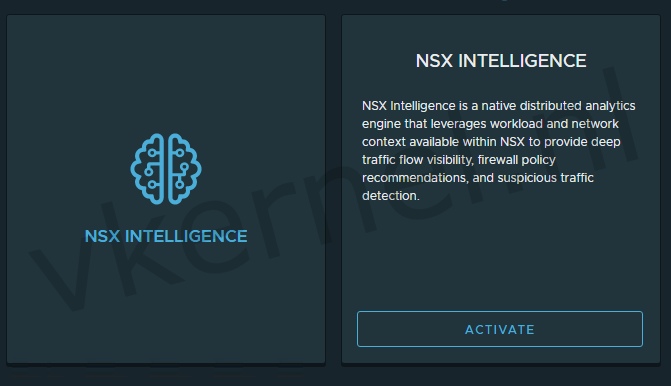
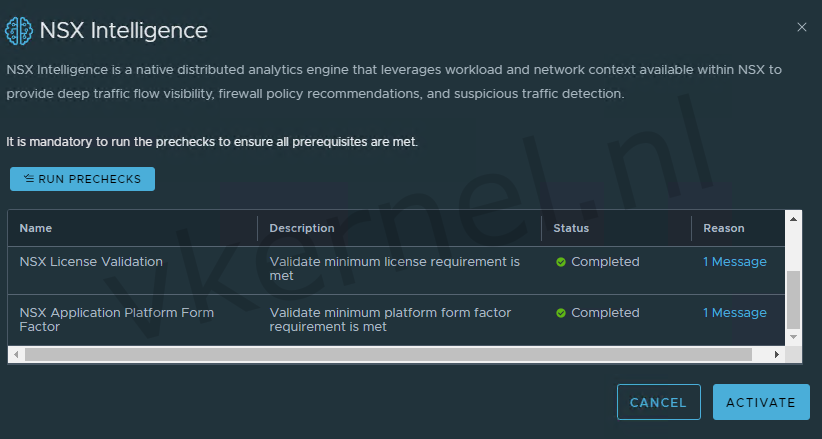
Run the Prechecks and click on activate

After the activation of NSX Intelligence and waiting for a few minutes, the tile we show the status of the feature.
NSX Intelligence
We now have NSX Intelligence activated within NAPP. We are now able to analyze network flows within our NSX-T Infrastructure.

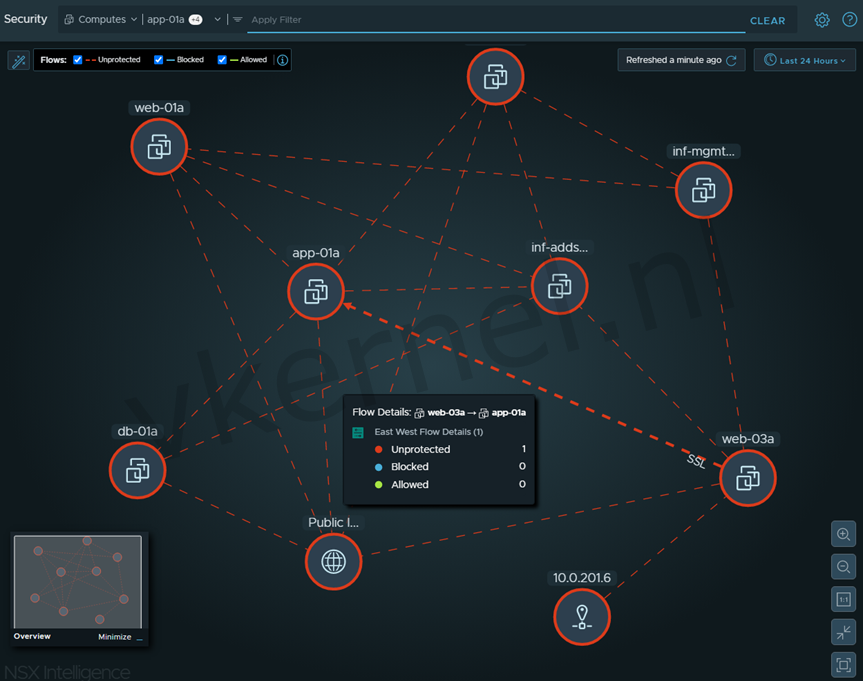
When opening the NSX Intelligence from the NAPP view or from the Plan & Troubleshoot --> Discover & Take Action, you will be shown all the network flows within your NSX-T infrastructure.
You can even have a selection of VMs (for example a 3 Tiered Application) and examine the flows between de VMs.

Overview of the flows between VMs within your NSX-T infrastructure
You can click on one of the flows to see the details of a flow. Information like Source, Destination and protocol will be shown.

Details of the flow between the web and application VM.
It is also possible to create recommended firewall rules based on the flows that has been analyzed with NSX Intelligence.
In the screenshot below, i have created a new recommendation based on the 3 tiered application i have in the environment.
NSX Intelligence will create some recommended firewall rules that could be configured automatically from the NSX Intelligence view.
Note: Keep in mind that the recommended firewall rules should be checked before applying it in the NSX-T.

#Final Words
This blog post was not only about the deployment of NAPP but could could also be used for the deployment of a Tanzu Supervisor Cluster. If you have any questions about NAPP or Tanzu, feel free to reach out to me in the comments section or on twitter.