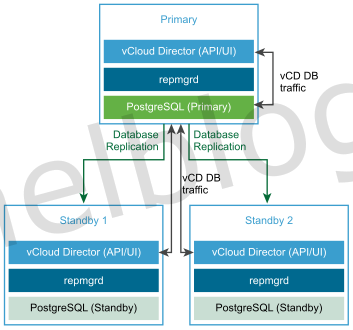
In this article, I will show you how to deploy vCloud Director 9.7 appliance cells in a HA topology. The installation of vCloud Director 9.7 is really straight forward and can be completed with the wonderful vCloud Director documentation page available online. In one of the upcoming articles, I will also demonstrate the migration from vCloud Director installed on a linux VM with external Microsoft SQL database to the new appliances with embedded PostgreSQL database.
Prerequisites
- The vCD appliance OVA file - url
- the vCD HA deployment documentation - url
- A NFS export that will serve the Transfer Server Storage - url
- DNS records for the primary and standby vCD cells, one for eth0 and the other for eth1.
Create DNS records
Start by creating several DNS records (A-records and PTR records) for the primary and standby vCD cells that will be used for deployment. Every vCD cell need to have two DNS records, one for eth0 and the other for eth1. In my case, I created the following dns records:
| DNS record | IP |
|---|---|
| vcd01.domain.local | 10.0.10.226 |
| vcd01-srv.domain.local | 10.0.11.226 |
| vcd02.domain.local | 10.0.10.227 |
| vcd02-srv.domain.local | 10.0.11.227 |
| vcd03.domain.local | 10.0.10.228 |
| vcd03-srv.domain.local | 10.0.11.228 |
Configure a CentOS NFS server
We have chosen to build a NFS server with CentOS, that will be used for the Transfer Server storage. The transfer server storage will provide temporary storage for uploads, downloads, and catalog items in vCD. The only type of shared storage for a transfer server storage is NFS. That said, let's start with configuring our CentOS NFS server:
Installing the NFS services
First of all, we need to install the nfs-utils package with the command shown below:
yum install nfs-utils
Enable the auto start of the NFS service and start the service:
systemctl enable nfs-server.service
systemctl start nfs-server.service
In my setup I have two partitions, one for the OS and the other for the NFS data. Create on the NFS data partition a new folder for the vCD share:
mkdir -P /nfs/vCDspace
The required folder permissions for the vCD folder is 750. Run the next command to change the folder permissions:
chmod -R 750 /nfs/vCDspace
If you want to use the multi-cell collection functionality to retrieve the logs of all the vCD cells via the vmware-vcd-support script, we need to set the ownership permissions to the root user on the vCD folder:
chown root:root /nfs/vCDspace
Next step is creating the NFS export. We need to use no_root_squash in the export configuration. I will use the subnet from the vCD cells in the export configuration as shown below:
/nfs/vCDspace 10.0.10.0/24(rw,sync,no_subtree_check,no_root_squash)
Notes:
- Make sure there is no space between each cell IP address and its immediate following left hand parenthesis in the export line.
- Use of the sync option in the export configuration prevents data corruption in the shared location if the NFS server reboots while the cells are writing data to the shared location.
- Use of the no_subtree_check option in the export configuration improves reliability when a subdirectory of a file system is exported.
After adding the entry in the /etc/exports file, manually export the file system by typing the following command in a terminal window:
exportfs
You should receive something like this:
/nfs/vCDspace 10.0.10.0/24
You should test the share first, before installing the vCD appliances.
Note: The NFS server in this example is a SPOF. If you want to use this in a production environment, make sure to have the NFS server redundant as well.
Deploying vCloud Director 9.7 primary cell
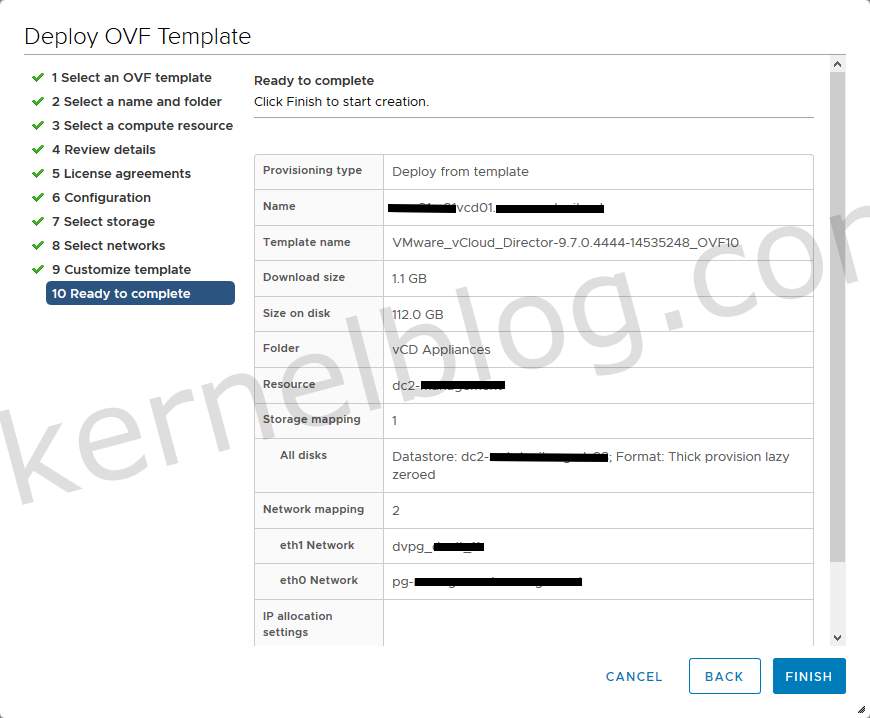
The deployment will be explained with the vSphere Web Client method instead of the OVF Tool. Deploy vCloud Director by starting the OVA deployment in vCenter and select the vCD file as shown below:
Fill in the Virtual machine name and select the target location

Select the compute resource that you would like to use
Review Details
Accept the license agreements
Select the deployment configuration you like. Primary Large is recommended for production
Select the Storage, virtual disk format and vm storage policy
Select the portgroups for eth0 and eth1
vCD Port configuration
Starting with version 9.7, the vCloud Director appliance is deployed with two networks, eth0 and eth1, so that you can isolate the HTTP traffic from the database traffic. Different services listen on one or both of the corresponding network interfaces. Two subnets are required to perform the deployment of vCD. Eth0 will be used for web GUI and API access.
| Service | Port on eth0 |
Port on eth1 |
|---|---|---|
| SSH | 22 | 22 |
| HTTP | 80 | n/a |
| HTTPS | 443 | n/a |
| PostgreSQL | n/a | 5432 |
| Management UI | 5480 | 5480 |
| Console proxy | 8443 | n/a |
| JMX | 8998, 8999 | n/a |
| JMS/ActiveMQ | 61616 | n/a |
Customize Template - Explanation
This part is for primary, standby and vCD Cell application:
Start of Selection
| Setting | Description |
|---|---|
| NTP Server | The host name or IP address of the NTP server to use. |
| Initial root password | The initial root password for the appliance. Must contain at least eight characters, one uppercase character, one lowercase character, one numeric digit, and one special character. |
End of Selection
Important:
The initial root password becomes the keystore password. The cluster deployment requires all the cells to have the same root password during the initial deployment. After the boot process finishes, you can change the root password on any desired cell.
Note:
The OVF deployment wizard does not validate the initial root password against password criteria. |
| Expire Root Password Upon First Login | If you want to continue using the initial password after the first login, you must verify that the initial password meets root password criteria. To continue using the initial root password after the first login, deselect this option. |
| Enable SSH | Disabled by default. |
| NFS mount for transfer file location | See Preparing the Transfer Server Storage. |
This part is only required for the primary cell:
| Setting | Description |
|---|---|
| 'vcloud' DB password for the 'vcloud' user | The password for the vcloud database user. |
| Admin User Name | The user name for the system administrator account. Defaults to administrator. |
| Admin Full Name | The full name of the system administrator. Defaults to vCD Admin. |
| Admin user password | The password for the system administrator account. |
| Admin email | The email address of the system administrator. |
| System name | The name for the vCenter Server folder to create for this vCloud Director installation. Defaults to vcd1. |
| Installation ID | The ID for this vCloud Director installation to use when you create MAC addresses for virtual NICs. Defaults to 1. If you plan to create stretched networks across vCloud Director installations in multisite deployments, consider setting a unique installation ID for each vCloud Director installation. |
This part is for primary, standby and vCD Cell application:
Start of Selection
| Setting | Description |
|---|---|
| Default Gateway | The IP address of the default gateway for the appliance. |
| Domain Name | The domain name, for example, mydomain.com. |
| Domain Search Path | A comma- or space-separated list of domain names for the domain search path of the appliance. |
| Domain Name Servers | The IP address of the domain name server for the appliance. |
| eth0 Network IP Address | The IP address for the eth0 interface. |
| eth0 Network Mask | The netmask or prefix for the eth0 interface. |
| eth1 Network IP Address | The IP address for the eth1 interface. |
| eth1 Network Mask | The netmask or prefix for the eth1 interface. |
End of Selection
Power on the newly deployed primary vCD Cell
Verifying vCD log files.
Verify if your cell deployment succeeded without any issues, you should check the following log files for any errors:
| Log | Location | Info |
|---|---|---|
| firstboot | /opt/vmware/var/log/firstboot | This log contains all the scripts that will be executed upon firstboot. |
| setupvcd.log | /opt/vmware/var/log/vcd/setupvcd.log | This log contains the logs of the vCD setup. Database creation/configuration will be shown here as well. |
| vcd_ova_ui_app.log | /opt/vmware/var/log/vcd/vcd_ova_ui_app.log | This log contains the vCD cluster status. |
| vami-ovf.log | /opt/vmware/var/log/vami/vami-ovf.log | This log contains information like DNS and IP configurations that will be applied to the appliance. |
Deploying vCloud Director 9.7 standby cells
Deploy two additional vCD standby cells to configure the HA topology. These can be deployed the same way as the primary but this time we select the standby-large in the configuration step. You need to select the same configuration size as the primary, so for example: primary-large would need two standby-large.
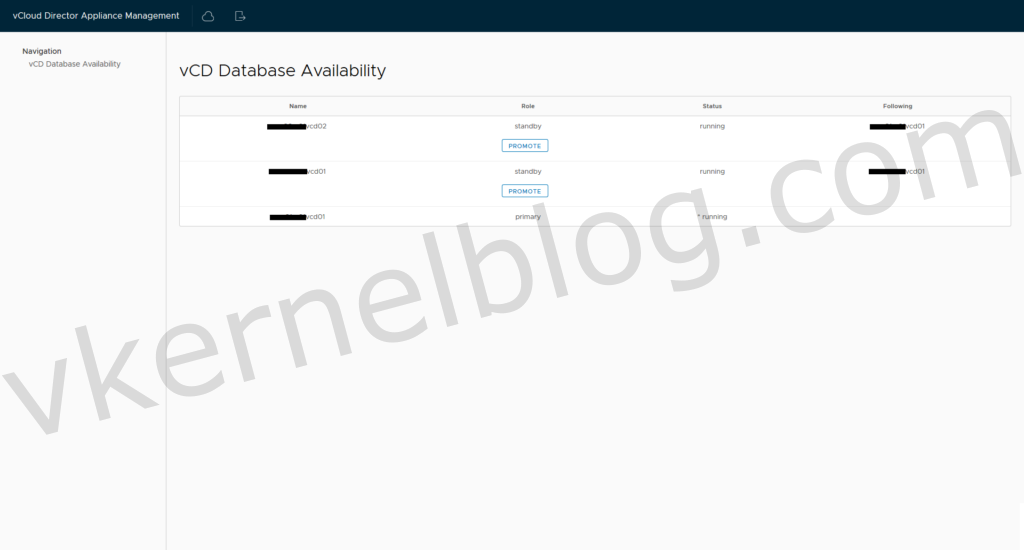
After the first and second standby appliance:
both standby cells are following the primary cell
Don't forget to verify the installation by checking the log files of the new deployed standby cells. If you would like to test the recovery of a failed primary node, please have a look on the following vCD documentation page by VMware - url.
Final words
One of the follow up blog post will be about migrating to the new vCD appliances. If you have any questions regarding the deployment of the vCD cells, please do not hesitate to leave a comment.


