CSE (Container Server Extenstion) is a extension for vCD that has been around for a while now, CSE is like PKS an VMware technology to run container based workloads in vCD. Implementing CSE in vCD, allows the tenant users to deploy kubernetes cluster as a service. VMware published a well documented GitHub page, where all the needed information can be found.
Prerequisites for Container server
As mentioned on the CSE GitHub page, there several prerequisites that need to be in place to implement CSE.
The prerequisites are:
- An org.
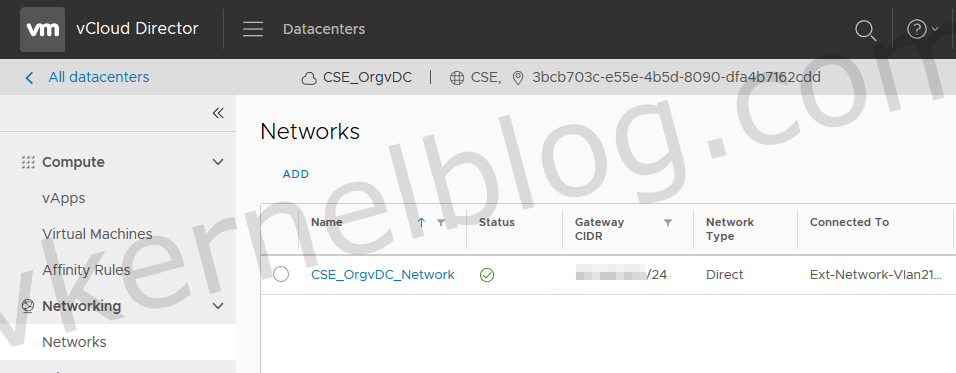
- A VDC within the org, which has an org VDC network connected to an external network (with Internet connectivity). The external network connection is required to enable cluster VMs to download packages during configuration.
- can host vApps
- has sufficient storage to create vApps and publish them as templates.
- Users in the org with privileges necessary to perform operations like configuring AMQP, creating public catalog entries, and managing vApps.
- A good network connectivity between the machine where CSE is installed and the vCD server as well as the Internet. This avoids intermittent failures in OVA upload/download operations.
Configuring prerequisites in vCloud Director
- Create a new Org:
2. Make sure that the following has been enabled on the Org:
3. Create a new OrgVDC and select the newly created Org as Organization.
4. Add a network to the new OrgVDC that has internet connectivity to download packages during the CSE configuration.
Installing the CSE server.
Installing OS and prerequisites
- Install CentOS with 2CPU and 4GB RAM of resources. (On the CSE github page, they do not specify the total amount of needed resources.)
- Install prerequisites for Python 3.7.3 before installing Python.
yum install gcc openssl-devel bzip2-devel libffi-devel
3. Download the Python version (3.7.3 or higher) you needed in an TGZ file format.
cd /usr/src
wget https://www.python.org/ftp/python/3.7.4/Python-3.7.4.tgz
4. With the following set of commands we can initiate the installation of Python.
Make altinstall is used to prevent replacing the default python binary file /usr/bin/python.
cd Python-3.7.4
./configure --enable-optimizations
make altinstall
5. Verify the Python version:
python3.7 --version
Python 3.7.4
6. Download the get-pip.py file from pypa.io:
curl https://bootstrap.pypa.io/get-pip.py -o get-pip.py
7. Install Pip:
python3.7 get-pip.py
8. Verify Pip version:
pip3 --version
pip 19.3.1 from /usr/local/lib/python3.7/site-packages/pip (python 3.7)
9. Install CSE:
pip3 install container-service-extension
10. Login to your vCloud instance with an system administrator account. When the logon action completed succesfully, you will be getting the following output: username logged in, org: 'System', vdc: ''.
vcd login vcddomain.com system username
10. Let's verify the version of CSE by running the following command:
vcd cse version
Error: No such command "cse".
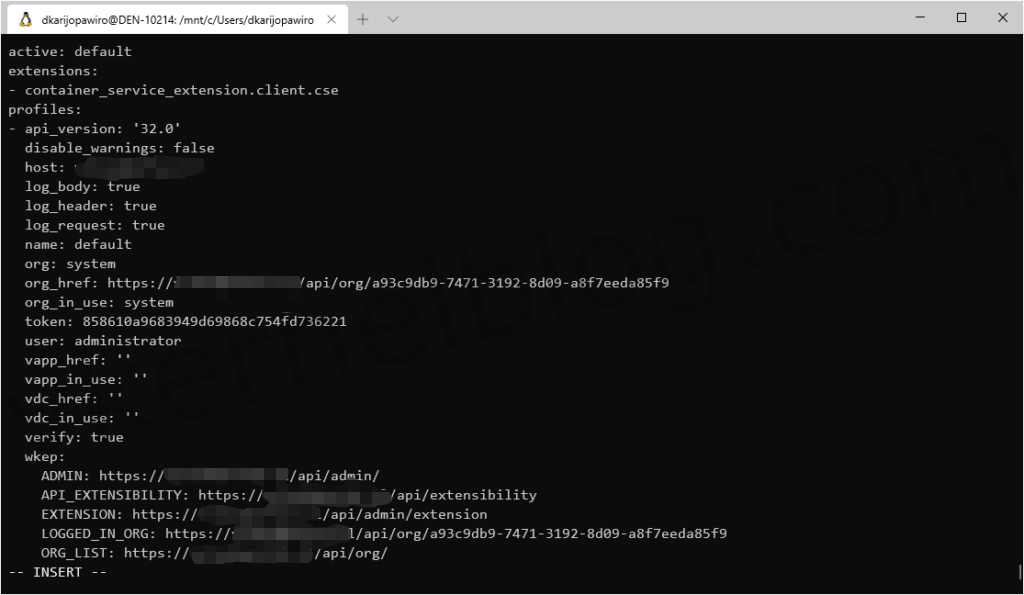
In the example above, there is an error that indicate the unknown command. The error is basically telling us that the CSE extension isn't working correctly. To fix this, we need to add two lines of code in the profiles.yaml file that has been located in ~/.vcd-cli/. The profiles.yaml file is available, after loggin in to vCD with vcd-cli. Place the two lines of code between the active and profiles section as shown below:
extensions:
- container_service_extension.client.cse
Try the same command again and it should work.
vcd cse version
CSE, Container Service Extension for VMware vCloud Director, version 2.5.1
Creating CSE config file
1. To create a config.yaml sample file, run the following command:
cse sample -o config.yaml
In the sample config file, there are 5 mandatory sections with information about the AMQP server, vCD server, vCenter server and orgVDC settings.
Example config.yaml file:
amqp:
  exchange: cse-ext
  host: amqp.vmware.com
  password: guest
  port: 5672
  prefix: vcd
  routing_key: cse
  ssl: false
  ssl_accept_all: false
  username: guest
  vhost: /

vcd:
  api_version: '33.0'
  host: vcd.vmware.com
  log: true
  password: my_secret_password
  port: 443
  username: administrator
  verify: true

vcs:
- name: vc1
  password: my_secret_password
  username: [email protected]
  verify: true
- name: vc2
  password: my_secret_password
  username: [email protected]
  verify: true

service:
  enforce_authorization: false
  listeners: 5
  log_wire: false

broker:
  catalog: cse
  default_template_name: my_template
  default_template_revision: 0
  ip_allocation_mode: pool
  network: mynetwork
  org: myorg
  remote_template_cookbook_url: https://raw.githubusercontent.com/vmware/container-service-extension-templates/master/template.yaml
  storage_profile: '*'
  vdc: myorgvdc

# [Optional] Template rule section
# Rules can be defined to override template definitions as defined by remote
# template cookbook.
# Any rule defined in this section can match exactly one template.
# Template name and revision must be provided for the rule to be processed.
# Templates will still have the default attributes that were defined during template creation.
# These newly defined attributes only affect new cluster deployments from templates.
# Template rules can override the following attributes:
# * compute_policy
# * cpu
# * memory

# Example 'template_rules' section:

#template_rules:
#- name: Rule1
#  target:
#    name: photon-v2_k8-1.12_weave-2.3.0
#    revision: 1
#  action:
#    compute_policy: "sample policy"
#    cpu: 4
#    mem: 512
#- name: Rule2
#  target:
#    name: my_template
#    revision: 2
#  action:
#    cpu: 2
#    mem: 1024
Installing CSE server with config.yaml
1. A valid public SSH key is required, to install the CSE software. If you do not have an SSH key yet, run this command to create one: ssh-keygen -t rsa -b 4096 -C "[email protected]".
Perform the CSE installation with the config.yaml file as shown below:
cse install -c config.yaml --ssh-key ~/.ssh/id_rsa.pub
There will be several checks performed, like testing connectivity with the configured AMQP server, vCenter server, vCD instance and OrgvDC. The installation will fail, if one of the checks failed. In the configured AMQP server, a new exchange will be created to handle the messaging for CSE. The CSE Kubernetes templates will be downloaded from GitHub and customized.
2. Validating the installation state of the CSE server:
cse check --config config.yaml --check-install
Required Python version: >= 3.7.3
Installed Python version: 3.7.4 (default, Nov 28 2019, 14:19:58)
[GCC 4.8.5 20150623 (Red Hat 4.8.5-39)]
Validating config file 'config.yaml'
Connected to AMQP server (amqp.yourdomain.local:5672)
Connected to vCloud Director (vclouddomain.com:443)
Connected to vCenter Server 'vca01.yourdomain.local' as '[email protected]' (vca01.yourdomain.local:443)
Config file 'config.yaml' is valid
Validating CSE installation according to config file
AMQP exchange 'cse-ext' exists
CSE on vCD is currently enabled
Found catalog 'cse'
CSE installation is valid
3. Validating the config.yaml file:
cse check --config config.yaml
Required Python version: >= 3.7.3
Installed Python version: 3.7.4 (default, Nov 28 2019, 14:19:58)
[GCC 4.8.5 20150623 (Red Hat 4.8.5-39)]
Validating config file 'config.yaml'
Connected to AMQP server (amqp.yourdomain.local:5672)
Connected to vCloud Director (vclouddomain.com:443)
Connected to vCenter Server 'vc01.yourdomain.local' as '[email protected]' (vc01.yourdomain.local:443)
Config file 'config.yaml' is valid
Configure CSE services
To start the CSE service on the CSE server, we need to run the cse run command with the required config.yaml file.
cse run --config config.yaml
If you would like to start the service in the background:
nohup cse run --config config.yaml > nohup.out 2>&1 &
Ideally, we would like to control the CSE service with systemctl. To set this up
Create a new file called cse.sh, that contains the cse run command.
vi /home/cse/cse.sh
Copy and paste the config as shown below:
cse run --config /home/cse/config.yaml
Create a new file called cse.service in the directory /etc/systemd/system/.
vi /etc/systemd/system/cse.service
We will now add the information like: ExecStart, User and WorkingDirectory as shown below. You need to make sure, that you are running the service with the correct service account and that you are pointing to the correct path of the cse.sh start script and working directory.
[Service]
ExecStart=/bin/sh /home/cse/cse.sh
Type=simple
User=cse
WorkingDirectory=/home/cse
Restart=always
[Install]
WantedBy=multi-user.target
Let's reload the systemctl config:
systemctl force-reload
Systemctl is now able to interact with the CSE service, as shown below
systemctl start cse
systemctl restart cse
systemctl stop cse
Enabling the AutoStart of the CSE service after an reboot:
systemctl enable cse
We now have successfully deployed CSE into vCloud Director. In the upcoming blog posts, I will be posting an follow up to show the deployment of an Kubernetes cluster with CSE in vCD.


